Ann Arbor Art Fair

I've returned from my mini vacation to the Ann Arbor Art Fair. The fair is always amazing and always very warm, and this year was no exception with 94 degrees and 100% humidity. We did get rained on this year which was a relief from the heat. The art fair is held all over the downtown and UofM campus area and  is the largest outdoor art fair in the country. If you ever have a chance to visit, you definitely should.

This photo is just one section of the art fair. I've taken a few photos with my phone to give you a taste of the fair.

Are you ready for a little eye candy?


Amazing bookmaking going on with this artist.

These are a few of the small pieces of work he does. The larger pieces sell for approximately $1700.

Beautiful collage in ceramic...yum.


It was a wonderful time with my friends. We spent the rest of our time making travel journals for our trip to Greece in September.

Now it's time for me to unpack and get back into the real world. Have a wonderful week!


Be Inspired


The challenge this week at Studio L3 is to use the Tim Holtz technique 'Multi-Medium Collage'. After I covered all of my pieces with paper from a very old book, I decided to use a Technique Junkie inking technique. I was thinking of using inchies, but it turned into something different.

The stamps are from Club Scrap and Paula Best. Hop on over to Studio L3 and take a look at art from the weekly challenges...may you be inspired.

I'm taking a mini vacation for the next few days to make my annual trip with my oldest, dearest friend, to the Ann Arbor Street Art Fair. We've been making this trip for many years now. I'm sure I'll return inspired...

Have a wonderful weekend...and Be Inspired.

Olivia & Kat


This is a layout of  my grand daughter, Olivia, with her Aunt Katrina (my daughter). The photo was taken in Florida, the day before Kat's wedding, where Liv was her flower girl. These two share a very special relationship.

The papers are from BoBunny, and the bird die cut was given to me from a friend a couple of years ago. I finally found a place for it. The butterfly is actually a button discovered at Joann's.

This was kind of fun & funky.


Christmas in July #3

I hope you're enjoying a little Christmas in July! If you haven't had a chance to visit the Paper Artists Online forum, please come over and take a look at our little group. We enjoy all types of paper crafting and are quite enthusiastic about sharing our art with each other. There are always a variety of swaps, challenges and round robin projects going on.
This will be my final tutorial, and I decided I needed to share something pretty with you. This is another type of resist technique with stunning results using ink. Scenic stamping was really what got me interested in rubber stamping and this is a very simple scenic type card.

You will need a bright white matte finish cardstock with little to no 'tooth'. I am using Georgia Pacific brand 110# white cardstock. You can find it at Wal-Mart, it very inexpensive and makes a great stamping surface. Find your favorite Christmas tree stamp and Christmas saying. I honestly don't own a single Christmas tree stamp, but am using this stamp from Stampscapes. It has become a personal challenge to myself to use this same stamp in different ways each year for my Christmas cards.

Choose your color of ink, pigment or dye. I am using Distress ink, Tumbled Glass, one of Rangers new colors this year. You will also need silver pigment ink, or clear embossing ink and silver embossing powder.

I didn't get the step out photos for this tutorial, but I think it's fairly easy to see what I've done. I chose to use a Spellbinders Nestabilities cutting plate to create this shape, and a larger size to cut the edge of the card. I think this creates the setting for an elegant piece. This would be equally pretty in just an oval shape, or a rectangular shape using a corner rounder.

I stamped the image using clear embossing ink, changing the height of the tree to create a sense of depth. After the trees were stamped, I embossed with silver embossing powder. Using a cheap sponge, I blended ink around all of the edges and up the trees a little, leaving plenty of white space. When adding ink to the edges, always start just off your paper and blend upward. This way you won't have any noticeable beginning marks. At this point, you will want to gently remove ink from the embossed images, using a rag or baby wipe. The words were stamped with black ink. Finish the card with your own special touch...it's quite lovely don't you think?

Thanks for stopping by...and if I don't get a chance to see you again, may you have a very Merry Christmas!

Christmas in July #2

The second tutorial for our Christmas in July, is a simple acrylic paint resist technique. Have you ever purchased a stamp that you just didn't know what to do with it? Well, perhaps get it out for this technique. For the purpose of demonstration, and because I love simplicity, I am only using two stamps on the card. You may choose to use several. Experiment and play!


I used these stamps from Inkadinkadoo. The image is so frilly, and the technique is quite rustic, striking a nice balance don't you think?

Choose cardstock, whatever color you would like you image to be, this will be the background paper for this technique. A heavier cardstock is recommended. I chose to use a heavy red cardstock. You'll also need your favorite brand of clear embossing ink, clear embossing powder, stamps of your choice and acrylic paint.

Cut your cardstock to whatever size your card will be. Use the clear embossing ink to stamp your image(s) and then clear emboss. This will act as a resist for the image.

After the embossed area has cooled down, it's time to make a mess. Get out a 1/2" or 1" paint brush and start brushing paint all over the top of the cardstock, and over the stamped image. I chose to brush in one direction, but experiment going in different directions if you like.

IMPORTANT: Let the paint dry naturally. Do not heatset the paint to dry it quicker, or your embossing powder will re-melt and the technique won't work. When I was making these I just set up an assembly line of a few cards and by the time I finished painting the last one, the first one was dry.

Take a rag, or a baby wipe that is damp and gently remove the paint from the embossed image. I don't recommend letting the paint sit overnight, or it may be more difficult to remove.

When I was finished, I distressed the edges with a sharp pair of scissors. Again, I used an old paper bag that was also distressed to mat the image. The distress was highlighted by gently inking around the perimeter of the paper.

Now it's time to finish/embellish this card in your own personal style. This technique is fun to use in a variety of your other projects also.

Here is a second sample of this card. If you do try this technique, I would love to see it. Please leave me a link.

Christmas in July #1

It's a Cyber-Crop weekend at Paper Artists Online. The theme is Christmas in July. I was asked to provide short tutorials for a few Christmas cards, so I thought I might as well post them here also.

We're going to use a Technique Junkie technique called 'Faux Designer Paper' to create these cards.

I chose to use these stamps from Pink Paislee. I purchased them at the end of the season last year and never had a chance to use them. They have a great vintage feel, don't you think?


For the background we're using kraft paper. Your stashed paper bags are the great economizer in this technique.  So get out your paper and some pigment ink with a little sparkle. I'm using Brilliance Ink Pearlescent Beige. Choose a stamp for your background. Randomly stamp this image all over your paper, remembering to turn the stamp in different directions. At this point, we're just laying ink down.

After your background is finished, grab a different color ink(s) and start stamping right over the top of your other images. If it makes you feel more comfortable, you can cut your paper to card size prior to stamping. I used Distress Aged Mahogany ink using a variety of stamps from the set. When you're finished stamping, perhaps crinkle the paper a little to give it an aged look.

The Christmas tree was stamped on chipboard, embossed and wrapped with metallic floss. Now assemble your cards using your favorite embellishements. I prefer to not make my Christmas cards too bulky, avoiding a surcharge at the post office.


Hope you've enjoyed the tutorial for the first card. Merry Christmas (in July).

Distress Powder

The challenge this week at Studio L3 is to use Tim's  distress powder technique from his recent book 'Compendium of Curiosities'. I used several colors of distress powder on this image and the background is from his original distress ink technique.

I must admit, I feel like I'm cheating a little this week. This piece was done 2 years ago and has been sitting in various places in my home since. It's such a simple piece, but I still love it today.

Christmas in July

There is going to be a Christmas in July cyber crop this weekend at Paper Artists Online. Several challenges will be offered; scrapbooking, card making and other paper arts. I was asked to prepare tutorials for a few cards and will be sharing them with you this weekend on my blog.

If you're looking for some Christmas inspiration, come visit us and join in. Thought I would put up a little sneak peek of one of the cards I'll be showing to get you in the Christmas spirit. It's a great time to start your card making, and take the stress off through the holidays.

Blue, Brown & Tan Challenge

I don't believe I have ever participated in a color challenge. Christy at Paper Arts Online started this challenge, and the only rules are that you have to use blue, brown and tan in your color scheme.


I was poking around in my paper stash and found this paper that looked sort of like vintage wallpaper to me. It was paired up with this Paperbag Studios stamp. I love the saying on this one, Happiness does not depend on outward things, but on the way we see them.

Thanks for stopping by...hope you're having a wonderful week.

The Song Sings Itself

In summer, the song sings itself. An art journal page finished for a round robin I'm involved with on the Paper Arts Online forum. Using some of the same techniques used on my previous Shabby Chic post, I had all of the items still on my table, so I used them.

The stamps are from Tim Holtz and Rubber Stamp Avenue. You can always click on the image, if you would like to see it larger.

I hope you're enjoying your summer, if it's summer where you live. Our summers are so short here in Michigan, we have to take advantage of every single day.

Shabby Chic

This week at Studio L3, the challenge is complete a piece using another Tim Holtz technique, 'Shabby Chic' from his book 'Compendium of Curiosities".

The stamps are from Tim Holtz and Club Scrap. Peach Bellini acrylic paint was used to create this 'shabby' look.

As is usual for me, the piece didn't end up looking as I had first imagined. It took on a life of it's own.

If you have a minute and want to look at some great art, click on the Studio L3 link above, where you'll be able to view all of the pieces submitted.


Thank you Linda for continuing to host these great Tim Holtz challenges.

Man Cards


Cards for men are difficult for me, are they for you? I've had this Nick Bantock stamp for quite awhile and pull him out when I just don't know what to do. It's quite versatile actually. He has such rugged good looks.


More feminine cards come easily for me, perhaps because I have so many feminine images to choose from. This is an old Hero Arts image stamped on a background I made using oil pastels.

Orange seems to be a favorite color of mine this summer...what's yours?

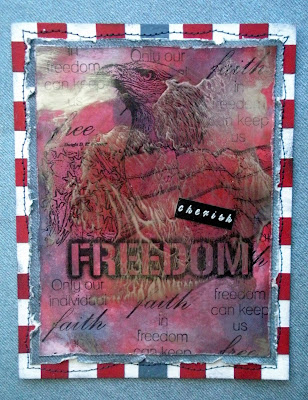
Cherish Freedom

Cherish Freedom...this is dear to my heart. I believe we live in uncertain times and should never take our freedom for granted.

This is another Alcohol Ink Monoprint background. I chose this particular one because it looks like there are flames coming out of the the word 'Freedom'.

Stamps are from Club Scrap.


I hope you enjoy a wonderful holiday, if you're celebrating.

Happy Independence Day America!

Alcohol Ink Monoprint

Studio L3 is hosting several weeks of challenges based on Tim Holtz techniques from his recent book 'Compendium of Curiosities'. As a Tim Holtz fan, I purchased this book as soon as it came into print. The challenge this week is based on using the Alcohol Ink Monoprint technique from this book.


 This is the card I submitted for the challenge, using  Ranger alcohol inks in Denim, Stonewashed, Slate and Metallic Silver. The stamps are from Artistic Outpost, which happen to be one of my favorite stamp companies these days.

Thanks for stopping by, hope you're gearing up for a wonderful holiday weekend.