Showing posts with label Paper Arts. Show all posts

Box Making

I've never had a decent way to store the bajillion cards that I make. They have been stuffed in odd size boxes, clam shells and never organized. I decided to make a box, it measures 17.5" x 7.5" x 5.5" high.

Thought I would share a little pictorial of the making of the box. All supplies are from Hollander's. You can see my previous post of box making here.

Box is made of heavy weight Davy board, or book board.


Yummy oversized papers from Hollanders.


The inside is covered in handmade banana paper, feels like velvet.
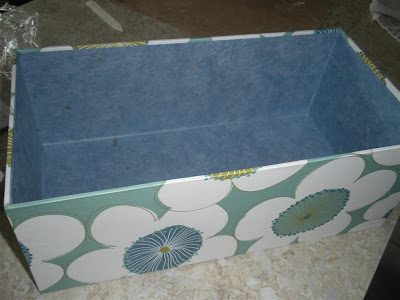


Covering the lid in heavily embossed paper.
 
 And finally, I have some organized storage for my cards, and a better idea of what I have in supply.


 How do you store your crafty items? Organization can be a dilemma for me. 
Thanks for stopping by and have a wonderful week!

Flower Girl

I've been missing in action lately, spring is here and along with it all of the yard work and gardening. I spend my winters dreaming of working in the dirt! Yes, can you believe that? I daydream of planting and nurturing my flower and vegetable gardens.

I created this Flower Girl in celebration of spring, she too is having visions of her garden.

We are having a Vintage Lottery at the Paper Artists Online group this month. Everyone that creates a piece for the challenge will have an opportunity to win all of the pieces at the end of the month. There is definitely some beautiful work. I submitted my Flower Girl for the challenge.

Have a wonderful week!

Be Glad of Life

This weeks challenge at Studio L3 for Grungy Monday 05 is to use this Tim Holtz technique in a project. The jest of it is to make a niche in your project. I have wanted to try this for awhile, and this is what I came up with.
Okay, so it feels unfinished to me too. But, I am at a loss here, do any of you have any ideas? I would like to finish it for a gift, perhaps an edging treatment?

Anyway, I made the papers using Club Scrap stamps using a variety of Adirondack and Distress inks. You can't really see all the layers of stamping, which I do like. I think I'll use your suggestions and come back next week with a finished project, hopefully.

Hop on over to the Studio L3 and look at all the beautiful entries of the finished projects, you won't be disappointed. My friend Rachelle is a guest designer there this week, and her project is just rockin'.

Until then, there's gardening to do...have a great weekend.

Music Has No Age

I'm enjoying another Grungy Monday Challenge at StudioL3 this week using Tim Holtz/Ranger Colorwash Sprays. The only specific guideline, was that we use actual Ranger product on our piece. I just happened to have a few of these in my stash. This is my entry for the challenge:
This piece was an accident for me. I was using a resist technique and gesso, forgetting that the Colorwash sprays were water based and the watercolor smeared during the process. I decided I loved the soft muted colors. The stamps are from Club Scrap.

If you would like to see a couple of more vivid pieces using Color Wash and paint, you can check out my Poppies here or an art journal piece here.

Stop on over at the StudioL3 blog and see how others have used these color saturated sprays.

Summer

Linda at Studio L3 has started a new series of weekly challenges called Grungy Monday, based on Tim Holtz techniques. This is the first week for the new challenge and we are to use this Tim Holtz technique to inspire our work.
I began with a mask from Club Scrap and sprayed with my home made mist (Shabby Shutters Distress Reinker and Green Patina Perfect Pearls). I rubbed in some Dried Marigold and Broken China Distress ink. The music stamp (Club Scrap) was stamped on the Grunge Paper flowers and on a scrap piece of paper and embossed with Copper embossing powder. Everything was spritzed and rubbed with the home made mist. I tore a few pieces of scrap to give the illusion of a landscape, and created a faux banner. All of the pieces were grunged up with Walnut Distress ink and assembled. I couldn't find the appropriate embellishment, so I stamped the hummingbird and did a little free form stitching.

There are so many wonderful artists participating in the challenge. Stop by Studio L3 to look at all the beautiful interpretations...and thank you for stopping by.

Compendium of Tulips

I never tire of using these tulip stamps from Club Scrap. I had started a project that looked totally different from these, but this is where it ended up. 

COMPENDIUM:  1)a collection, 2) a list of a number of things, 3) a compilation


This first piece is a wall hanging for a PIF (pay it forward) swap. I used Tombow Markers to color the images and Distress Inks were brayered on the backgrounds.


The remainder of the 'compendium' are cards.  I can't wait to see my 200+ tulips this spring. They're there, waiting...just under the snow.


When the sun warms the ground, they'll rise their heads to the warmth of spring....and bloom.


I can't wait for the bloomin' spring! Hope you have a great week.

Art Doll #2

I missed my previous doll 'Dreamona' so much, that I had to create a new one for me. She's a little different, a little sad, don't you think? I almost put a tear drop on her cheek, but decided against it. This doll has a home, all glittery and sparkly...which is exactly what she needs to keep her from being melancholy. Maybe she's suffering from the winter doldrums.


Here's a close up of her 'happy house'. The whole piece is 6.5" wide x 12" high.  This was very difficult to photograph. I could use suggestions on how to photograph such bright items.
But she really needs a name..ideas? Thanks for stopping by to take a look.

The Life of Dreamona

Earlier this month, I talked about being involved in an art doll swap.This was the beginning sketch of my art doll using heavy Davey board and charcoal that I shared a couple of weeks ago. I love the look of these whimsical little dolls that I have seen online and thought I would have a go at it.
 
Here is the progress I made coloring 'Dreamona' with Prismacolor pencils. I was able to finish her face, which was really my greatest fear and even put a little twinkle in her eyes. She's approximately 12" tall.

Since she's been finished, 'Dreamona' has just been hanging around my craft area, making my heart happy and telling me wonderful stories about where she's going to her new home in Wyoming.
I had thought about gussying her up a bit, but thought her new owner might have fun doing that. I've loved her just the way she is. Farewell my friend, now go spread your happy dust around in Wyoming. I'm sure you'll warm her heart too.

Paper Quilt

There was a challenge last month at the Gingersnap Creation site to make a paper quilt and then create art using the paper. If you go to Mccallsquilting.com there is a plethora of wonderful quilting patterns. I used the Crystals pattern to create this quilt.
 
 The paper are from Echo Park. I chose a simple pattern and was glad that I did. For my project, I made color copies of the paper and saved my masterboard.
I signed up for a swap to make pennants for a Christmas banner that will spell JOY. I created the three J's for this project. I decided that a quilt should have a little sewing on it, so I got out my machine and did a little outline sewing on the paper.
This is my finished pennant, that went in the mail this week to my swap partners.
and a close up...
I made a couple variations for my partners and myself. The scraps were used to create a few cards. The first J's I made, were not large enough for this project, but worked great for cards.
I was too late to enter the challenge, but it was a creative blast for me. I've traveled so much this fall, my creative mojo was in a slump. 
Changing subjects here...I've never liked my blogspot background since I've changed it...anyone have any suggestions?

Art Journal #2

I finished my 4 week online art journal class this week at My Creative Classroom. This second journal features french stitching to bind the signatures. I learned a few new techniques for my journal pages. My favorite would be the glue crackle, which makes interesting striations. This type of stitching allows for the journal to lay absolutely flat. I intend to use it as a travel journal for my trip to Greece this fall. I'll wait till I return to decorate the cover, as I'm sure there will be some wear involved as I use it. Have you ever used a travel journal? Do you have any tips on things to include?

Art Journal Class

I finished my first art journal through my online class at My Creative Classroom. It's been interesting taking an online course. I'm sure all of you have done this before, but it's a first for me. Easy, self-paced and I'm really enjoying it. This art journal is 5x7 and has 9 signatures, 3 pages each. So there are a total of 54 pages for me to play on. Basic techniques were used to create backgrounds and if I want to change any of them, well...that is what gesso is for. It is bound with a double running long stitch. I have one more journal to make in this class, using different techniques and binding method.

Making Boxes

One of my favorite paper stores, Hollander's, is physically located in Ann Arbor, but they do have an online business also. The store is owned by Tom & Cindy Hollander, IMHO they are the guru's of book binding and all things paper. Last year they published their first book, Constructing and Covering Boxes, a beginner's guide to constructing boxes, which I purchased. I have made boxes before, but their methods are a little different and much more sturdy. For instance, they use book cloth in the spine ensuring that the hinge will last for many years. The book focuses on hinge and clamshell style boxes. This is my first box using their methods, and their yummy paper.

Christmas Advent Box

A Christmas advent box for my 2 year old grand daughter. There are 24 drawers, leading up to Christmas, filled with goodies to delight the heart of my grand baby.